
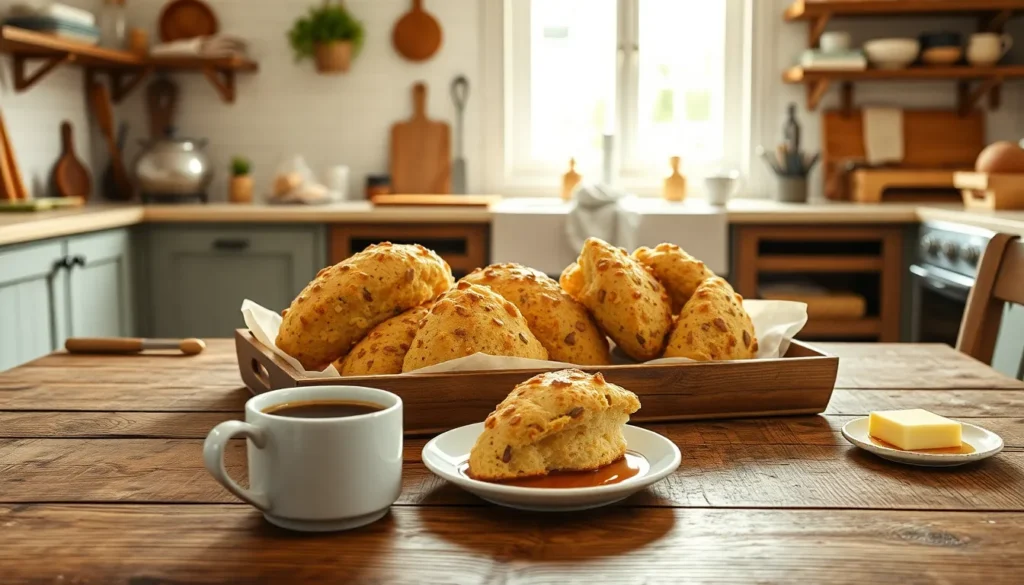
We’ve cracked the code for gluten-free scones that’ll make you forget they’re missing wheat entirely. These tender, buttery treats prove that going gluten-free doesn’t mean sacrificing flavor or that perfect crumbly texture we all crave in a classic scone.
Whether you’re dealing with celiac disease, gluten sensitivity, or simply exploring healthier baking options, our foolproof recipe delivers bakery-quality results every single time. We’ve tested countless flour blends and techniques to create scones that are light, fluffy, and absolutely delicious.
The best part? These gluten-free scones come together in just 30 minutes and pair beautifully with your morning coffee, afternoon tea, or weekend brunch spread. We’ll show you exactly how to achieve that golden exterior and tender interior that makes every bite irresistible.
Ingredients
These carefully selected ingredients work together to create gluten-free scones with the perfect tender crumb and golden crust. We’ve tested each component to ensure you get consistent bakery-quality results every time.
Dry Ingredients
- 2 cups gluten-free flour blend (containing xanthan gum)
- 1/3 cup granulated sugar
- 1 tablespoon baking powder
- 1/2 teaspoon salt
- 1/4 teaspoon xanthan gum (only if your flour blend doesn’t contain it)
- 6 tablespoons cold unsalted butter, cubed
Wet Ingredients
- 1/2 cup cold heavy cream
- 1 large egg
- 1 teaspoon vanilla extract
- 2 tablespoons milk (for brushing tops)
Optional Add-ins
- 1/2 cup fresh or dried berries (blueberries, cranberries, or raspberries)
- 1/3 cup mini chocolate chips
- 2 tablespoons fresh lemon zest
- 1/4 cup chopped nuts (almonds, pecans, or walnuts)
- 2 tablespoons fresh herbs (rosemary or thyme for savory scones)
- 1/4 cup shredded cheese (cheddar or gruyere for savory variations)
Equipment Needed

Making perfect gluten-free scones requires the right tools to handle the unique properties of gluten-free dough. We’ve found that having these essential pieces of equipment makes the difference between frustrating failures and bakery-quality results.
Large mixing bowl serves as our foundation for combining all ingredients evenly. The spacious surface allows us to incorporate the butter without overworking the delicate gluten-free flour blend.
Measuring cups and spoons ensure accuracy with our carefully tested ingredient ratios. Precise measurements become even more critical with gluten-free baking since there’s less room for error compared to traditional wheat-based recipes.
Metal dough scraper proves invaluable when working with the characteristically wet gluten-free dough. This tool helps us handle the sticky mixture without adding excess flour that could make our scones dense.
Pizza slicer cuts through the soft dough cleanly to create perfectly shaped wedges. Traditional knives can drag and tear the delicate texture we’ve worked so hard to achieve.
Bosch mixer offers an optional upgrade for those who prefer mechanical mixing. This powerful tool efficiently combines ingredients while maintaining the light touch essential for tender scones.
Candy thermometer becomes necessary if you plan to try the fried scone variation. Maintaining oil temperature between 350°F and 375°F ensures golden exteriors without greasy interiors.
Frying pan or large pot accommodates the frying method for those seeking a different texture experience. The vessel should hold at least 2 inches of oil for proper frying results.
Having these tools ready before you begin streamlines the process and helps ensure consistent results every time you bake these gluten-free treats.
Instructions

Follow these step-by-step instructions to create perfectly tender gluten-free scones with a golden exterior. We’ve tested each technique to ensure consistent bakery-quality results every time.
Prep the Dry Ingredients
Whisk together 2 to 3 cups of gluten-free flour blend with 1/4 cup granulated sugar in a large mixing bowl. Add 2 teaspoons baking powder and 1/2 teaspoon salt to the mixture. Include xanthan gum if your flour blend doesn’t already contain it for better texture. Whisk all dry ingredients until well combined and evenly distributed throughout the bowl.
Mix the Wet Ingredients
Combine 1 large egg with 3/4 cup of cold heavy cream in a separate bowl. Whisk these ingredients until smooth and well blended. Add 1 teaspoon vanilla extract to enhance the flavor profile. Keep this mixture cold while you prepare the next step for optimal scone texture.
Combine and Form the Dough
Cut 1/4 to 1/2 cup of cold unsalted butter into small cubes and add to the dry ingredients. Use your metal dough scraper or fingertips to work the butter into the flour until the mixture resembles coarse crumbs. Pour the wet ingredients into the dry mixture and gently fold together until a soft dough forms. Fold in any optional add-ins like berries or chocolate chips at this stage.
Shape and Cut the Scones
Turn the dough onto a lightly floured surface and gently pat it into a circle about 1 inch thick. Use a round cutter or sharp knife to cut out individual scones. Press straight down without twisting to ensure proper rising. Gather any remaining dough scraps and gently re-form to cut additional scones.
Bake the Scones
Preheat your oven to 425°F for optimal browning. Place the shaped scones on a parchment-lined baking sheet with 2 inches of space between each one. Bake for 12 to 14 minutes until the tops are golden brown and the scones have risen properly. For extra crispy tops start at 500°F then reduce to 400°F after placing the scones in the oven.
Directions for Different Variations

Once you’ve mastered our basic gluten-free scone recipe, we can explore delicious variations that cater to every taste preference. These adaptations use the same fundamental techniques while incorporating unique flavors and ingredients.
Sweet Gluten Free Scones
Gluten-Free Blueberry Scones transform our base recipe into a berry-filled delight by folding 1 cup of fresh or frozen blueberries into the dough along with 1 teaspoon of fresh lemon zest. We recommend tossing the berries in a tablespoon of gluten-free flour before adding them to prevent sinking. Top these scones with a tangy lemon glaze made from 1 cup powdered sugar, 3 tablespoons fresh lemon juice, and 1 teaspoon lemon zest for extra brightness.
Vegan Gluten-Free Chocolate Chip Scones offer a dairy-free alternative using 2 cups almond flour combined with ½ cup arrowroot flour as the base. Replace butter with ⅓ cup solid coconut oil and substitute buttermilk with ¾ cup full-fat coconut milk mixed with 1 flax egg (1 tablespoon ground flaxseed mixed with 3 tablespoons water). Fold in ½ cup mini chocolate chips and sweeten with ¼ cup coconut sugar instead of granulated sugar.
Lemon Raspberry Scones create a perfect springtime treat by incorporating 2 tablespoons fresh lemon zest into the dry ingredients and gently folding ¾ cup fresh raspberries into the formed dough. These scones work beautifully as dairy-free and paleo-friendly options when using coconut oil and almond milk substitutions.
Savory Gluten Free Scones
Basic Savory Scones eliminate the sugar from our original recipe and reduce the amount to just 1 tablespoon for subtle sweetness. Add 1 teaspoon each of dried thyme and rosemary to the flour mixture, along with an extra ½ teaspoon of salt to enhance the savory profile. We recommend brushing the tops with beaten egg and sprinkling with coarse sea salt before baking.
Cheese and Herb Scones elevate the basic savory version by incorporating 1 cup of sharp cheddar cheese, grated and tossed with flour to prevent clumping. Mix in 3 tablespoons of fresh chopped herbs such as parsley, chives, or dill. The cheese creates beautiful golden spots and adds richness to every bite.
Vegan Savory Options adapt our cheese and herb recipe by replacing butter with vegan margarine and using unsweetened almond milk instead of heavy cream. Substitute the cheese with 3 tablespoons of nutritional yeast for a nutty, cheese-like flavor without dairy. Add an extra tablespoon of herbs to compensate for the missing cheese flavor intensity.
Make-Ahead Instructions

Preparing gluten-free scones ahead of time transforms your baking routine and ensures fresh-baked treats whenever you crave them. We’ve tested multiple make-ahead methods to help you enjoy these delicious scones with minimal morning prep.
Chilling the Dough
After mixing all ingredients together, we recommend wrapping the dough in plastic wrap and refrigerating for 20-30 minutes. This chilling period allows the gluten-free flour to properly hydrate and creates a more cohesive dough that’s easier to handle. The cold temperature also helps maintain the butter’s solid state, which contributes to the scones’ flaky texture.
Freezing Unbaked Dough
Raw scone dough freezes exceptionally well for extended storage. Wrap the formed dough tightly in plastic wrap and place it in a freezer-safe container. We’ve successfully stored dough for up to 5 days with excellent results, though some recipes allow freezing for up to 2 months. When ready to bake, thaw the dough in the refrigerator overnight before shaping and cutting.
Flash-Freezing Cut Scones
For ultimate convenience, we shape the dough into individual scones before freezing. Place the cut scones on a parchment-lined baking sheet and flash-freeze for approximately 30 minutes. Once solid, transfer them to a freezer-safe bag or airtight container. This method prevents the scones from sticking together and allows you to bake only the quantity you need.
Baking from Frozen
Frozen scones can bake directly from the freezer without thawing. Preheat your oven to 500°F, then reduce to 425°F once you place the scones inside. Extend the baking time by 2-3 minutes beyond the standard 12-14 minutes, watching for the characteristic golden brown color that indicates doneness.
| Storage Method | Duration | Best For |
|---|---|---|
| Refrigerated dough | 20-30 minutes | Same-day baking |
| Frozen whole dough | 5 days to 2 months | Planned baking sessions |
| Flash-frozen cut scones | Up to 2 months | Individual portions |
Storage Tips

Proper storage ensures our gluten-free scones maintain their delicious taste and texture for days after baking. We’ve tested various storage methods to provide you with the most effective approaches for keeping your scones fresh.
Room Temperature Storage
Store your freshly baked gluten-free scones in an airtight container at room temperature for optimal freshness. This method keeps scones delicious for up to 2-3 days while maintaining their tender crumb and golden exterior. We recommend placing parchment paper between layers if stacking multiple scones to prevent sticking.
Refrigerated Storage
Leftover scones store beautifully in the refrigerator when placed in an airtight container. This approach extends freshness for up to 4 days beyond the initial baking date. Refrigerated scones maintain their moisture content better than those stored at room temperature for extended periods.
Freezing Baked Scones
Long-term storage becomes simple when you wrap scones tightly in plastic wrap or aluminum foil before freezing. Properly wrapped scones maintain their quality for up to 3 months in the freezer without losing flavor or texture.
| Storage Method | Duration | Container Type |
|---|---|---|
| Room Temperature | 2-3 days | Airtight container |
| Refrigerated | 4 days | Airtight container |
| Frozen | 3 months | Tightly wrapped |
Reheating Instructions
Reheat frozen scones in a preheated oven at 350°F for approximately 10 minutes to restore their original texture and warmth. Alternatively, use your microwave at 50% power for about 30 seconds for quicker results. Oven reheating produces the best texture by recreating that fresh-baked crispness on the exterior while keeping the interior tender.
Make-Ahead Freezing Strategy
Unbaked scone dough freezes exceptionally well for ultimate convenience. Cut your prepared dough into scone shapes and place them on a sheet tray to freeze until solid. Transfer the frozen shaped scones to a ziplock bag for storage up to 1 month. When baking from frozen, add an extra 4-6 minutes to the standard baking time for perfectly golden results.
Serving Suggestions

Fresh from the oven gluten-free scones pair beautifully with your favorite hot beverages. We recommend serving them alongside morning coffee or afternoon tea to create the perfect breakfast or brunch experience. The tender crumb and golden exterior complement both bold coffee flavors and delicate tea varieties.
Enhance your scones with simple yet elegant toppings that elevate their natural flavors. Glazes made from powdered sugar mixed with lemon juice create a bright citrusy finish for sweet varieties. Vanilla-based glazes work wonderfully with chocolate chip or berry scones. We find that drizzling the glaze while scones are still slightly warm allows it to set perfectly.
Traditional accompaniments bring out the best in both sweet and savory versions. Honey provides natural sweetness that complements the nutty flavors from gluten-free flour blends. Fresh butter spreads easily on warm scones and adds richness to every bite. For savory options like cheese and herb scones, we suggest serving with garlic chive butter to amplify the savory notes.
Create an impressive brunch spread by offering multiple serving options. Sweet scones work beautifully with fresh berries, whipped cream, or clotted cream for a traditional British tea experience. Our lemon raspberry scones shine when served with additional fresh raspberries and a light dusting of powdered sugar.
Consider the dietary needs of your guests when planning accompaniments. Dairy-free margarine works excellently for those avoiding dairy, while sugar-free glazes accommodate low sugar diets. The versatility of these gluten-free scones makes them suitable for various dietary requirements including low FODMAP diets when paired with appropriate toppings.
Temperature matters when serving for optimal enjoyment. We recommend serving scones within 2 hours of baking when they retain their tender interior and crispy exterior. Room temperature scones also taste excellent and travel well for picnics or office gatherings.
Troubleshooting Common Issues

Even with our carefully tested recipe, gluten-free scones can sometimes present unique challenges. We’ve identified the most common problems bakers encounter and developed reliable answers to help you achieve perfect results every time.
Dealing with Gritty Texture
Rice flour in gluten-free blends often creates an unpleasant gritty texture that can ruin the eating experience. We recommend letting your batter rest for 15-20 minutes after mixing to allow the rice flour particles to soften and hydrate properly. This simple waiting period transforms the texture from gritty to smooth and tender.
Creating Flaky Layers
Many bakers struggle to achieve the signature flaky layers that make scones so appealing. Cold butter serves as the key to success in this area. We ensure our butter stays thoroughly chilled throughout the mixing process, which creates steam pockets during baking that result in those coveted flaky layers. Room temperature butter will blend too completely with the flour and eliminate this layered effect.
Preventing Crumbly Scones
Overly dry dough produces scones that fall apart and lack cohesion. Gluten-free flours absorb liquid differently than wheat flour, so we adjust by adding more liquid when the dough feels too dry. Start with an extra tablespoon of cream or milk and add more as needed until the dough holds together without being sticky.
Storage Answers
| Storage Method | Duration | Instructions |
|---|---|---|
| Room Temperature | Up to 3 days | Store in airtight container |
| Freezing Unbaked Scones | Up to 2 months | Shape, cut, flash freeze, then store in freezer bag |
| Freezing Baked Scones | Up to 3 months | Cool completely, then freeze in airtight container |
| Thawing | Variable | Room temperature or microwave for 25 seconds |
Adapting for Dietary Restrictions
We easily accommodate dairy-free diets by substituting cold dairy-free butter and any type of plant-based milk. The key remains keeping these ingredients cold to maintain the proper texture. Different gluten-free flour blends and starches can dramatically affect your final results, so we encourage experimenting with various combinations to find your preferred texture and flavor profile.
Conclusion
We’ve shared everything you need to create bakery-quality gluten-free scones that’ll impress everyone at your table. From our tested ingredient combinations to foolproof techniques these recipes deliver consistent results every time.
Whether you’re craving sweet blueberry scones for weekend brunch or savory herb varieties for dinner our versatile base recipe adapts to your preferences. The make-ahead options and storage tips we’ve provided make it easy to enjoy fresh scones whenever the craving strikes.
Don’t let gluten restrictions hold you back from enjoying perfectly flaky tender scones. With our comprehensive guide you’re equipped to bake confidently and create delicious memories around every batch.
Frequently Asked Questions
What makes these gluten-free scones different from regular scones?
These gluten-free scones are specially formulated with tested flour blends and techniques to achieve the same tender, fluffy texture as traditional wheat scones. They’re perfect for those with celiac disease or gluten sensitivity, delivering bakery-quality results without compromising on taste or texture.
How long does it take to make gluten-free scones?
The entire process takes just 30 minutes from start to finish. This includes prep time, mixing ingredients, shaping the dough, and baking. The quick timeline makes them perfect for breakfast, brunch, or whenever you want fresh-baked scones.
Can I make the scone dough ahead of time?
Yes! You can chill the dough for 20-30 minutes before baking for better texture, or freeze unbaked dough for up to 2 months. Cut scones can be flash-frozen and baked directly from frozen with adjusted baking times.
What gluten-free flour blend works best for scones?
The recipe uses a carefully tested gluten-free flour blend that ensures consistent results. While specific blend recommendations aren’t detailed in the summary, the article emphasizes using proven combinations that create light, fluffy textures with golden exteriors.
How should I store leftover gluten-free scones?
Store fresh scones in an airtight container at room temperature for 2-3 days, refrigerate for up to 4 days, or freeze for up to 3 months when tightly wrapped. Reheat in the oven for best texture or microwave for quick warming.
What are some popular scone variations I can try?
Sweet options include blueberry, chocolate chip, and lemon raspberry scones. For savory varieties, try basic savory scones or cheese and herb versions. The article also includes vegan adaptations for those with dairy restrictions.
What equipment do I need to make perfect gluten-free scones?
Essential tools include a large mixing bowl, accurate measuring cups and spoons, a metal dough scraper for handling sticky dough, and a pizza slicer for clean cuts. A Bosch mixer is recommended for mechanical mixing if preferred.
Can I customize these scones with my own add-ins?
Absolutely! The recipe accommodates various add-ins including fresh or dried berries, mini chocolate chips, lemon zest, nuts, fresh herbs, and shredded cheese. These additions allow you to create personalized flavors while maintaining the base recipe’s success.