
We’ve all experienced that perfect moment when rich espresso meets decadent cake – it’s pure magic. Espresso cake recipes transform your favorite morning brew into irresistible desserts that’ll make coffee lovers swoon. From moist chocolate espresso layer cakes to delicate coffee-infused sponges, these recipes pack serious caffeinated punch.
There’s something special about baking with espresso that regular coffee just can’t match. The concentrated flavor creates depth and complexity that elevates any cake from ordinary to extraordinary. Whether you’re hosting a dinner party or treating yourself to an afternoon indulgence, espresso cakes deliver that sophisticated coffee shop experience right in your kitchen.
We’ve gathered our most beloved espresso cake recipes that range from beginner-friendly to bakery-worthy showstoppers. Each recipe captures that bold espresso essence while maintaining the perfect balance of sweetness and moisture. Get ready to discover your new favorite way to combine two of life’s greatest pleasures – coffee and cake.
Ingredients
Quality ingredients form the foundation of exceptional espresso cakes. We’ve carefully selected each component to enhance the bold coffee flavors while creating the perfect texture and moisture.
For the Espresso Cake
- 2 cups all-purpose flour
- 1¾ cups granulated sugar
- ¾ cup unsweetened cocoa powder
- 2 teaspoons baking soda
- 1 teaspoon baking powder
- 1 teaspoon salt
- 2 large eggs, room temperature
- 1 cup buttermilk, room temperature
- 1 cup strong espresso, cooled
- ½ cup vegetable oil
- 2 teaspoons vanilla extract
- 1 cup boiling water
For the Espresso Buttercream
- 1 cup unsalted butter, softened
- 4 cups powdered sugar, sifted
- ¼ cup strong espresso, cooled
- 2 tablespoons heavy cream
- 1 teaspoon vanilla extract
- ¼ teaspoon salt
For the Chocolate Ganache (Optional)
- 8 ounces dark chocolate, finely chopped
- 1 cup heavy cream
- 2 tablespoons unsalted butter
- 1 tablespoon espresso or strong coffee
- Pinch of salt
Equipment Needed
 2")
Creating exceptional espresso cakes requires the right tools to achieve professional results. We’ve compiled a comprehensive list of essential equipment that will help you master these coffee-infused desserts.
Essential Baking Equipment
Our most important tool is a reliable stand mixer or electric mixer. This equipment handles the heavy lifting when creaming butter with sugar and whipping eggs to the perfect consistency. The mixer also proves invaluable when preparing espresso buttercream or whipped cream frosting that requires precise texture.
We recommend using two 8-inch or 9-inch cake pans for traditional layer cakes. Some bakers prefer three 6-inch pans for creating taller, more dramatic presentations. Both options work beautifully for espresso cake recipes.
Parchment paper becomes essential for lining cake pans. This simple addition prevents sticking and ensures clean removal of your finished cakes. We always keep extra sheets on hand for multiple baking sessions.
Optional Professional Tools
A bench scraper elevates your frosting game significantly. This tool helps achieve smooth, professional-looking sides on your finished cakes. While not mandatory, it makes a noticeable difference in presentation.
Cake strips offer another professional touch by preventing dome formation during baking. These fabric strips wrap around pan exteriors and promote even heat distribution throughout the baking process.
Standard Baking Essentials
Every espresso cake project requires basic tools that form the foundation of successful baking. We need mixing bowls in various sizes, rubber spatulas for folding ingredients, and accurate measuring cups and spoons. These fundamental tools ensure precision in every recipe step.
| Equipment Type | Essential Items | Optional Upgrades |
|---|---|---|
| Mixing | Stand mixer, bowls, spatulas | Multiple bowl sizes |
| Baking | 8-9 inch pans, parchment paper | 6-inch pans, cake strips |
| Finishing | Measuring tools | Bench scraper |
| Preparation | Basic utensils | Professional tools |
Having the right equipment transforms espresso cake baking from challenging to enjoyable. Each tool serves a exact purpose in creating the perfect balance of bold espresso flavor and tender cake texture.
Instructions
 4")
Let’s walk through the step-by-step process for creating our rich and flavorful espresso cake. We’ll start with preparing the espresso base and move through each stage to achieve the perfect balance of bold coffee flavor and tender cake texture.
Prep the Espresso
We begin by dissolving 3 tablespoons of espresso powder in 1 cup of recently boiled water to create a strong brewed espresso. This concentrated mixture serves as the foundation for both our cake batter and buttercream frosting. Allow the espresso to cool slightly while we prepare the remaining ingredients. The strength of this espresso directly impacts the depth of coffee flavor in our finished cake.
Make the Cake Batter
We preheat our oven to 350°F and grease two 8-9 inch round cake pans before lining them with parchment paper. In a large mixing bowl we sift together our dry ingredients: 2 cups all-purpose flour, 1/2 cup Dutch processed cocoa powder, 2 teaspoons baking powder, 1/2 teaspoon baking soda, 1/2 teaspoon salt, and 2 cups granulated sugar.
Using a separate bowl we whisk our wet ingredients until smooth: 2 large eggs, 1/2 cup vegetable oil, 1/2 cup whole milk, and 1 teaspoon vanilla extract. We combine the wet ingredients with the dry mixture using gentle folding motions to avoid overmixing. Slowly we incorporate the prepared espresso into our batter. The mixture will appear very runny at this stage which is exactly what we want for a moist final result.
Bake the Cake
We divide our batter evenly between the prepared pans and place them in the preheated oven. Baking time ranges from 25-40 minutes depending on pan size and individual oven characteristics. We test for doneness by inserting a toothpick into the center of each cake. The toothpick should emerge mostly clean with just a few moist crumbs attached.
Overbaking results in dry cake so we remove the pans as soon as the toothpick test passes. We allow our cakes to cool completely in their pans before turning them out. Refrigerating the cooled cakes for 30 minutes before slicing helps maintain clean layer cuts during assembly.
Prepare the Espresso Buttercream
We create our buttercream by beating room temperature butter until light and fluffy using our stand mixer or electric mixer. Gradually we add powdered sugar one cup at a time while continuing to beat. Once smooth we incorporate vanilla extract and our reserved espresso mixture. We adjust the espresso quantity to achieve our desired coffee intensity. The finished buttercream should hold its shape while remaining smooth and spreadable.
Assemble the Cake
We place our first cake layer on our serving plate and spread a generous amount of espresso buttercream across the top surface. The second layer goes on top and we press gently to ensure good contact. Using our offset spatula we apply a thin crumb coat of buttercream around the entire cake. After chilling for 15 minutes we apply the final layer of buttercream to the top and sides. We can add mini chocolate chips between layers for extra texture and enhanced chocolate flavor if desired.
Directions for Variations
 6")
We can transform our basic espresso cake recipe into exciting variations that showcase different flavor profiles and textures. Each variation builds upon our foundation while introducing unique elements that elevate the coffee experience.
Espresso Chocolate Cake
We start by preheating our oven to 350°F (180°C) and preparing two 8-inch round pans with parchment paper. In a large bowl, we whisk together 2 cups all-purpose flour, 1¾ cups granulated sugar, ¾ cup cocoa powder, 2 teaspoons baking soda, 1 teaspoon baking powder, and 1 teaspoon salt.
Next, we create our wet mixture by combining 2 large eggs, 1 cup vegetable oil, 1 cup whole milk, and 2 teaspoons vanilla extract in a separate bowl. We dissolve 2 tablespoons espresso powder in 1 cup hot water, stirring until completely smooth.
We pour the wet ingredients into our dry mixture and stir until just combined. The espresso mixture gets added gradually while we mix on low speed, creating a thin batter that ensures maximum moisture. We divide the batter evenly between our prepared pans and bake for 25-30 minutes until a toothpick inserted in the center comes out with just a few moist crumbs.
Mocha Layer Cake
Our mocha variation requires three 6-inch cake layers for dramatic height and visual impact. We prepare our standard espresso cake batter and divide it among three prepared pans, adjusting our baking time to 20-25 minutes for the smaller layers.
The coffee buttercream becomes the star of this variation. We cream 1 cup softened butter until light and fluffy, then gradually add 4 cups powdered sugar. We dissolve 3 tablespoons instant coffee in 2 tablespoons hot water and cool completely before adding to our buttercream along with 1 teaspoon vanilla extract.
Assembly requires patience and precision. We place our first layer on a serving plate and spread ¾ cup buttercream evenly across the surface. The second layer gets positioned carefully, followed by another buttercream layer. We crown the cake with our final layer and apply a thin crumb coat of frosting before refrigerating for 30 minutes. Our final frosting layer covers the entire cake smoothly, creating the perfect canvas for decoration.
Espresso Pound Cake
We begin this dense and rich variation by preheating our oven to 325°F (163°C) and preparing a 9×5-inch loaf pan with butter and flour. In our stand mixer, we cream 1 cup softened butter with 1½ cups granulated sugar until light and fluffy, approximately 5 minutes on medium speed.
Four large eggs get added one at a time, ensuring each incorporates fully before adding the next. We dissolve 3 tablespoons instant coffee in ¼ cup hot water and cool to room temperature. Our dry ingredients include 2 cups all-purpose flour, 1 teaspoon baking powder, and ½ teaspoon salt, which we whisk together separately.
We alternate adding our flour mixture and the cooled espresso mixture to our creamed butter, beginning and ending with flour. The batter should be smooth and thick. We pour into our prepared pan and bake for 60-70 minutes until a toothpick inserted in the center comes out clean. The finished pound cake develops a beautiful golden crust while maintaining a tender, coffee-infused crumb throughout.
Make-Ahead Instructions
 8")
Planning ahead transforms our espresso cake baking experience into a stress-free try. We can prepare various components days or weeks in advance while maintaining the rich coffee flavors and moist texture that make these cakes exceptional.
Preparing and Storing Cake Layers
Our cake layers benefit from advance preparation in several ways. We can bake the espresso cake layers completely, allow them to cool thoroughly, then wrap each layer tightly in plastic wrap. These wrapped layers stay fresh at room temperature overnight or up to two days before we assemble and decorate them. This advance preparation actually improves the cake’s moisture retention and makes the layers easier to handle during the frosting process.
For longer storage, we freeze our cooled cake layers individually wrapped in plastic wrap for several weeks. The freezing process makes our cakes easier to stack and decorate since frozen layers hold their shape better. When we’re ready to use them, we simply thaw the layers overnight at room temperature before assembling and frosting.
Buttercream and Frosting Preparation
We prepare our espresso buttercream ahead of time and store it in an airtight container in the refrigerator. Before using the stored buttercream, we bring it to room temperature and rewhip it if needed to restore its smooth, spreadable consistency. This advance preparation saves valuable time on the day we plan to serve our cake.
Assembly and Storage Timeline
| Storage Method | Timeline | Key Benefits |
|---|---|---|
| Room Temperature (wrapped layers) | Up to 2 days | Maintains moisture, easier handling |
| Frozen Layers | Several weeks | Better stacking, extended storage |
| Refrigerated Assembled Cake | Several days | Complete advance preparation |
| Room Temperature Assembled | Up to 24 hours | Optimal flavor and texture |
We assemble and frost our complete espresso cake no more than 24 hours before serving if storing at room temperature. For longer advance preparation, we use refrigeration to store our fully decorated cakes for several days.
Serving Preparation
Our refrigerated espresso cakes require at least 30 minutes at room temperature before serving. This resting period allows the flavors to develop fully and ensures the cake achieves its optimal texture. The room temperature serving enhances both the espresso flavor intensity and the cake’s tender crumb structure.
These make-ahead strategies give us flexibility in our baking schedule while ensuring our espresso cakes remain fresh and flavorful when we serve them to family and guests.
Storage Tips
 10")
We understand the importance of keeping your espresso cake fresh and delicious for as long as possible. Our storage recommendations ensure you can enjoy every last bite of your homemade creation.
Room Temperature Storage
We recommend storing your espresso cake in an airtight container at room temperature for optimal freshness. Your cake will maintain its moisture and flavor for 3 to 5 days when properly covered. This method works particularly well for cakes with buttercream frosting that don’t require refrigeration.
Refrigeration Guidelines
We suggest refrigerating espresso cakes only when they feature cream-based frostings like mascarpone coffee cream. While refrigeration keeps these delicate toppings safe, we’ve noticed that extended cold storage can dry out the cake over time. For the best eating experience, we always bring refrigerated cakes to room temperature before serving to restore their tender texture and full flavor profile.
Freezing for Long-Term Storage
We find freezing to be an excellent option for preserving espresso cake layers and individual slices. Our method involves wrapping unfrosted cake layers tightly in plastic wrap followed by aluminum foil. This double-wrapping technique prevents freezer burn and maintains quality for up to 3 months.
| Storage Method | Duration | Best For |
|---|---|---|
| Room Temperature | 3-5 days | Buttercream frosted cakes |
| Refrigeration | 5-7 days | Cream-based frostings |
| Freezing | Up to 3 months | Unfrosted layers or slices |
Thawing and Serving Preparation
We always thaw frozen cake layers in the refrigerator overnight rather than at room temperature for even defrosting. Once thawed, we let the cake sit at room temperature for 30 minutes before serving to achieve the perfect texture. This final step ensures your espresso cake tastes as fresh and flavorful as the day you baked it.
Professional Storage Tips
We weigh ingredients in grams during preparation because accurate measurements contribute to better storage longevity. Room temperature ingredients create more stable cake structures that maintain freshness longer. These professional techniques help your espresso cake retain its quality throughout its storage period.
Serving Suggestions
 12")
We believe the best espresso cakes deserve thoughtful presentation that enhances their rich coffee flavors. These versatile desserts adapt beautifully to various occasions and complement many accompaniments.
Coffee Shop Style Presentation works wonderfully for our layered espresso cakes. We recommend serving generous slices alongside freshly brewed coffee or espresso shots to create an authentic café experience. The Coffee Layer Cake with Vanilla Espresso Buttercream pairs exceptionally well with a cappuccino or latte.
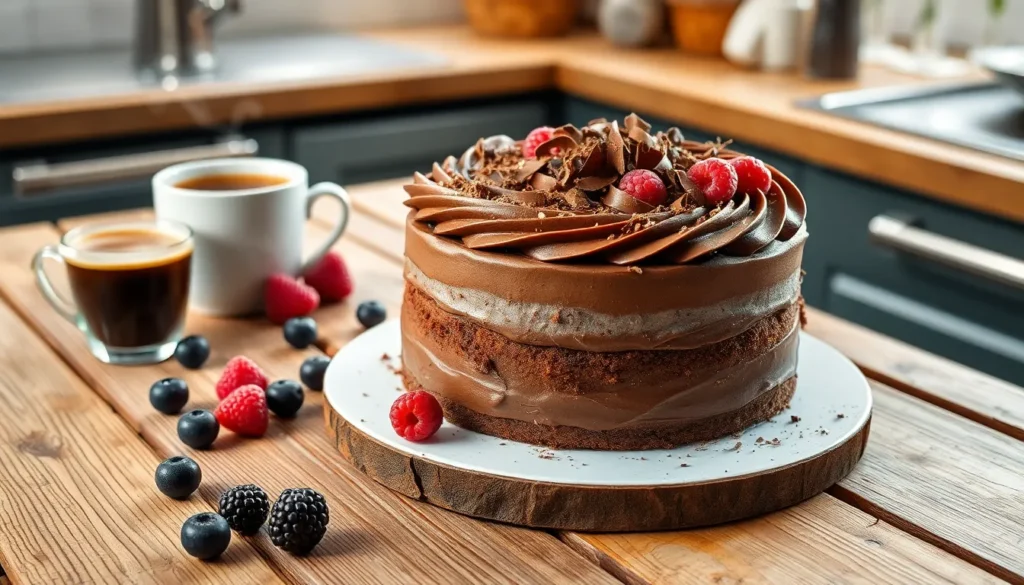
Elegant Dessert Course presentation elevates our Chocolate Espresso Cake to special occasion status. We suggest dusting individual plates with cocoa powder before placing cake slices and adding a dollop of freshly whipped cream. Fresh berries provide a bright contrast to the rich espresso flavors.
Brunch Service transforms our espresso cakes into perfect morning treats. The Espresso Chocolate Chip Cake works beautifully cut into smaller squares and served buffet style. We recommend pairing these portions with fresh fruit salad and mimosas for a complete brunch experience.
Temperature Considerations significantly impact flavor delivery in espresso cakes. We serve most variations at room temperature to allow the espresso notes to fully develop. But our Wicked Espresso Cake benefits from slight warming which intensifies the coffee aromatics.
Garnish Options enhance both visual appeal and flavor complexity. We suggest topping slices with chocolate shavings espresso beans or a light dusting of instant espresso powder. Mini chocolate chips scattered around the plate create an attractive presentation for the Espresso Chocolate Chip Cake variation.
Portion Sizing varies based on the richness of each recipe. Our standard recommendation includes generous 3 to 4 inch slices for lighter variations like the Coffee Layer Cake. The more decadent Chocolate Espresso Cake serves best in smaller 2 to 3 inch portions due to its intense flavor profile.
Beverage Pairings complement rather than compete with espresso cake flavors. We recommend serving alongside milk-based coffee drinks cold brew or even dessert wines like port. Non-coffee drinkers enjoy these cakes with vanilla ice cream or a glass of cold milk.
Conclusion
We’ve shared everything you need to create stunning espresso cakes that’ll impress any coffee lover. From essential ingredients and equipment to detailed recipes and storage tips we’ve covered all the bases for your baking success.
These versatile recipes work perfectly whether you’re planning ahead for a special occasion or treating yourself to a weekend project. The make-ahead options and storage guidelines ensure you can enjoy fresh espresso cake whenever the craving strikes.
Now it’s time to brew that perfect espresso and start baking. With these proven techniques and flavor combinations you’ll create desserts that capture the rich boldness of your favorite coffee shop right in your own kitchen.
Frequently Asked Questions
What makes espresso cake different from regular coffee cake?
Espresso cake uses concentrated espresso shots instead of regular coffee, creating a more intense and complex flavor profile. The bold espresso adds depth and richness that regular coffee can’t match, resulting in a more sophisticated dessert with pronounced coffee notes that balance perfectly with sweetness.
What ingredients do I need to make espresso cake?
Essential ingredients include all-purpose flour, granulated sugar, cocoa powder, and strong espresso. You’ll also need butter, eggs, and baking powder for the cake base. For frosting, prepare butter, powdered sugar, and additional espresso. Optional chocolate ganache requires heavy cream and chocolate chips.
What equipment is necessary for baking espresso cake?
A reliable stand mixer or electric mixer is essential for proper creaming and whipping. Use two 8-inch or 9-inch cake pans (or three 6-inch pans for taller cakes) lined with parchment paper. Optional professional tools like a bench scraper and cake strips can enhance presentation and ensure even baking.
Can I make espresso cake ahead of time?
Yes, cake layers can be baked 1-2 days in advance and stored at room temperature, or frozen for up to 3 months. Espresso buttercream can be prepared ahead and refrigerated. Assembled cakes should be stored in airtight containers and can be refrigerated for optimal freshness.
How should I store espresso cake?
Store espresso cake in an airtight container at room temperature for 3-5 days if using buttercream frosting. Cakes with cream-based frostings should be refrigerated, though this may dry out the cake over time. Unfrosted layers or slices can be frozen for longer storage.
What are some popular espresso cake variations?
Popular variations include Espresso Chocolate Cake for double chocolate lovers, Mocha Layer Cake combining espresso and chocolate flavors, and Espresso Pound Cake for a denser texture. Each variation maintains the bold espresso flavor while offering different textures and complementary flavors.
How do I serve espresso cake for best results?
Serve espresso cake at room temperature for optimal flavor. Pair with freshly brewed coffee for a café experience. For special occasions, dust plates with cocoa powder and add fresh berries. Consider smaller portions due to the cake’s richness, and pair with complementary beverages like espresso or dessert wine.